Wednesday, October 31, 2012

Knock You Naked Bars


"I'm going to marry these!"


Truer words have never rang from my lil bro's mouth.

He might have laughed when he asked the names of these little devils before he took a bit. One bite and he was in love. So in love that he thought he'd marry them.

I love my little brother. He's the best taste tester ever. Way better than the hubs (sorry love ya hun!). He's single therefore every time I make something and he gets to taste test he gets super pumped over it. The hubs on the other hand just says one word answers. Nothing like "I'm going to marry these!" Of course I might take offense to that coming from the hubs.

Maybe it's because my mom trained him so well. Yup going to give mom some credit on this one. Not sure how she trained him to ooo and ahhh over meals and treats, but I'm going to have to pick her brain on this one so I can get the hubs trained.

The hubs...trained. Wow that's a laugh. Does anyone ever get them trained?

If you do please share your secret.

I should also give some credit to the older bro. We were out for Halloween and he had dropped his daughter off to relieve my mom from looking after Miss K. In the midst of the festive bar atmosphere he had to lean over and say, "You have one less bar at home. They were amazing!"

Oh yes that's right this Momma thought she'd go out for a few adult beverages this past weekend. Yup, that cured me of that for another year. I need sleep. 

So if you need someone to propose, love you, oooo and ahh please head to the kitchen with this recipe in hand immediately.


Knock You Naked Bars

Ingredients
2 1/4 c. all-purpose flour
1 tsp baking soda
1 tsp salt
1 c. butter, softened
3/4 c. sugar
3/4 c. packed brown sugar
1 tsp vanilla extract
2 eggs
2 c. semi-sweet chocolate chips


5 oz evaporated milk
1 bag (14 oz) caramels
1/2 c. peanut butter

1. Preheat oven to 375 degrees. Grease a 9 x 13 in pan.

2. Combine flour, baking soda and salt in small bow. Beat butter, sugar, brown sugar and vanilla in a large mixing bowl until creamy. Add eggs, one at a time, beating well after each addition. Gradually mix in flour mixture. Stir in chocolate chips.

3. Spread half of cookie dough into the prepared pan. Bake for 8-10 minutes. Remove from oven.

4. While the cookie dough is baking melt caramels and evaporated milk in a double boiler. Add peanut butter after caramels are melted. Melt thoroughly. Spread over baked cookie dough base.

5. With the remaining cookie dough, drop by spoonfuls ontop of the caramel mixture.

6. Bake for 15-20 minutes or until light golden brown.

Recipe adapted from: The Bite Sized Baker

This recipe may be shared on the following sites - Please give them a visit!

Labels:

Monday, October 29, 2012

Blogger Opportunity

Follow my blog with Bloglovin
 
I love these coffee makers and I would love the offer this giveaway to readers.
Bloggers, here is the sign up information for now. 
Readers, it's coming soon!

Have A Keurig Holiday Event

Prizes: Keurig Platinum Series Quiet Brewer + K-Cups {4 prize packages = 1 a week}
Event dates: 11/2-11/9 and 11/9-11/16 and 11/16-11/23 and 11/23-11/30

Free Blog Event! Sign-up here, BLOGGERS WANTED

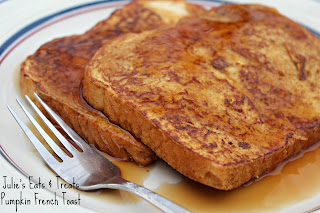
Pumpkin French Toast

Yup. I've finally moved on from my beloved apple recipes this fall. If you miss them a few of them are Caramel Apple Cobbler, Apple Pull Apart Bread, Apple Struesel Bread and MANY more. Go check them out in my Recipe Box!

After apple comes pumpkin in my opinion. That's right it's one more step closer to that beloved holiday Thanksgiving.

I love Thanksgiving because it's a great time to take time to reflect and remember what we truly have been blessed with in life. I have so many blessings. The latest one being Miss K of course!

The funny thing about Thanksgiving for me? I don't like turkey! That's right. I could really do without it. A sin I bet you think?

Another thing you are going to think is a sin....I don't get excited about Pumpkin pie usually. There are very few I like, but I did have one at my sister-in-laws the other weekend and liked it so maybe my taste buds are growing up?

This french toast recipe has just a hint of pumpkin and welcomes in our favorite time of year!

Pumpkin French Toast
Printer Friendly Recipe

Ingredients
2 Eggs
1/4 c. milk
1/4 c. pumpkin
1 tsp pumpkin pie spice
1/2 tsp cinnamon
2 Tbsp brown Sugar
8 slices of bread


1. In a shallow bowl, beat eggs and milk and until well combined. Add in pumpkin, pumpkin pie spice, cinnamon and brown sugar. Mix until combined.

2. Dip bread into egg mixture.

3. Place bread on preheated griddle sprayed with non stick spray.  Cook on each side for about 2 minutes. Serve with syrup.

Recipe from: Semi Homemade Mom


This recipe may be shared on the following sites - Please give them a visit!

Labels:

Friday, October 26, 2012

Parmesan Crusted Pork Chops

Can't say I make a lot of pork chops but I've had a few hanging out in the depths of my freezer and all of a sudden I decided it was time those bad boys be gone.

I'm on a mission. It's called using up everything in the freezer and cupboards. OK well that's not going to happen BUT I'd like to make a large dent in it. I go through spurts like this. Does anyone else?

As we were sitting eating supper the hubby glances my way and says, "So where'd you get this recipe. It's really good!"

My answer is, "Oh so I can't come up with anything on my own dear?"

Yup that's right these little pork chops were my creation.

Don't worry. That doesn't happen much. I like recipes. As in someone else has tried it before. Sure I'll adapt a few things here and there and throw in a new twist but for the most part I don't go out of my box to much.

I'm OK with that. I've embraced it. Kudos to you out there that have the ambition and time to develop recipes. We need people like you!

So if you have some pork chops hanging out in that freezer whip these up. You might even have all the ingredients on hand!


Parmesan Crusted Pork Chops
Printer Friendly Recipe

Ingredients
4 boneless pork chops
1/4 c. Parmesan cheese, grated
2 Tbsp dried Italian seasoned breadcrumbs
1/8 tsp paprika
1 tsp dried parsley
1/2 tsp garlic powder
1/4 tsp fresh ground pepper

2 Tbsp Olive Oil

1. Preheat oven to 450 degrees. 

2. Mix Parmesan cheese, breadcrumbs, paprika, parsley, garlic powder and pepper together. Transfer to plate. 

3. Put olive oil in a frying pan and heat on medium-high. Swirl the pan to coat.
4. Dip each pork chop in the mixture. Pat to make it stick if needed.

5. Add pork chops to pan and saute for 2 minutes on each side until golden brown. Place in a glass baking dish and baked for 8-10 minutes or until internal temp reaches 145 degrees.


This recipe may be shared on the following sites - Please give them a visit!

Labels:

Wednesday, October 24, 2012

Caramel Apple Cobbler

I'm a farm girl through and through. You can take the girl off the farm but you can't take the farm out of the girl. It will never leave me. It's a lifestyle. Not that I'm very far from the farm. I moved to "town", which happens to be a whopping 5,000 people. The farm is all of a great seven miles away.

Every spring I'm calling Daddy (that's right "Daddy" I'll always be his little girl) and asking how much he's got in the field, what field he's in or bugging my little bro about what's going on out at the farm.

Fall time rolls around and I'm constantly scanning the fields for the first sign of harvest. I love that sweet smell of fall. The crops coming out, crisp autumn leaves, fresh dirt from the fields being worked. I'm a dork. Have you noticed yet?

My family is also spoiled. My amazing mother, seriously amazing, brings a hot meal out to the field every night. How's that for service? It's like meals on wheels. She gets tired and burned out though, so being the wonderful daughter I am (I'm saying this only to boost my ego) I volunteer a couple times every fall and bring supper out.

I love it. The guys rave and ooh and ahh over what you make. Shovel it in their mouths and run back to their combine, truck, tractor or whatever their wheels happen to be. Then I climb in with one of them, usually the little bro in the combine and tag along. We have some good talks in that combine. We solve all our problems, tease each other and just hang out while watching the deer wander by. True bonding time. Miss K even got in on this year's combine ride!

I love the farm. End of story.

This little treat I whipped up is super easy and the guys loved it as a dessert for their meal out in the field.


Caramel Apple Cobbler
Printer Friendly Recipe

Ingredients
1 box yellow cake mix
2 cans apple pie filling
1 c. butter, melted
1/4 c. caramel ice cream topping

1. Pour filling into bottom of greased 8x11 casserole pan. Top with caramel ice cream topping. Pour dry cake mix over filling.

2. Pour butter on top of cake mix.

3. Bake at 350 degrees for 45-60 minutes.


Recipe adapted from: A Cowboy's Wife


This recipe may be shared on the following sites - Please give them a visit!


Labels:

Monday, October 22, 2012

Cheese Stuffed Bread Sticks

Another month has passed and it's time for the Secret Recipe Club reveal again! I love getting to check out new blogs and being "forced" to try a new recipe from them. Like any one really needs to force me to try a new recipe!

This months assignment for me was The Kitchen Witch. Perfect for Halloween huh? Rhonda is a fun loving, "biker chick" that will just lay it out how it is. I love that. We all need some good old sass in our lives.

This recipe so so super easy and wonderful that I'm in love with it. Who doesn't love a breadstick that has cheese literally oozing out of it?

I knew I had to make these by a certain date but never knew what I was going to make them with until I decided one night to make this wonderful Hearty Chili Mac to welcome in the cold and blustery weather we've been blessed with lately. I had invited my brother over for supper and knew I'd have an extra body to feed and help us eat these yummy bread sticks.

These were devoured. Amazing! And I once again got awesome sister points and maybe even some awesome wife points!

If you are looking for a treat for the big football game coming up or a side for a pasta this is it!


Cheese Stuffed Bread Sticks
Printer Friendly Recipe

Ingredients
1 can (13.8) oz refrigerated pizza crust
6 pieces of string cheese
1 Tbsp butter, melted
1/4 c. grated Parmesan cheese
1/4 tsp garlic salt

1. Preheat oven to 400 degrees.

2. Unroll the pizza crust onto parchment lined baking sheet. Pull and shape it into a rectangle.

3. Evenly space 6 pieces of string cheese on one half of the dough. Carefully fold other half of dough over the string cheese. Using your fingers, gently press and seal along the outer edge and between the string cheese pieces.

4. Lightly brush the top with melted butter, sprinkle with garlic salt and grated cheese.

5. Place breadsticks into the oven and baked for 13-18 minutes or until golden brown.

6. Cut with a pizza cutter.


Friday, October 19, 2012

Crock Pot Ranch Roast

I recently started attempting to feed Miss K cereal. I've been dragging my feet majorly, but last weekend I made up my mind this is the weekend to do it. Oh my goodness I didn't know what I was in for at all!

My mom once told me, or maybe she told me multiple times because I remember her telling me, "Julie I almost broke down in tears when I tried to feed your older brother the first times."

Oh Mom you are totally exaggerating and I have it so much more together it can't be that hard can it? I mean Miss K is a rockstar (not that older bro isn't LOVE YA!) it can't be that bad.

Oh she was right. I kind of want to throw the spoon across the kitchen when it comes to supper time.

It goes something like this....

Cereal in the mouth
Funny face
Cereal out of the mouth, down the bib, down the high chair, you get the picture
Miss K smiles

Honestly?! Why do you have to smile ever time you spit it out.

So tonight I'll try again. Because that's what you do when you are a mom. You keep trying. Someday you will get it. Or Miss K will get it.

Because we are Mom's and even if you aren't I know you love fast recipes since you keep coming back! This is a melt in your mouth dish and it's done when you come home from work. It's a different twist on the general old Crock Post Roast with the ranch but you will not be disappointed! 

Oh if you have any feeding tips let me know!

Remember to go enter the Tiny Prints Giveaway for your chance to win a $50 print credit!


Crock Pot Ranch Roast
Printer Friendly Recipe

Ingredients
2 1/2 lb roast
1 lb red potatoes, halved
1 can cream of chicken soup
8 oz package cream cheese
1 envelope ranch salad dressing mix

1. Coat crock pot with nonstick cooking spray or stick in one of those handy dandy crock pot liners.


2.  Placed halved potatoes on bottom of the crock pot and place meat on the potatoes.

3. In a bowl whisk together soup, cream cheese and dressing mix. Pour over meat and potatoes in slow cooker.

4. Cover and cook on low for 9-10 hours or on high for 4 1/2 to 5 hours.


Recipe From: Six Sisters' Stuff

Shared on the following sites - Please give them a visit!

Labels: ,

Wednesday, October 17, 2012

Tiny Prints Giveaway!

Christmas is going to be here before we know it! I LOVE Christmas. Especially getting all those cute cards from family and friends. I hope that tradition never goes away even with all this technology there is just something about getting those cards in the mail that excites me!

I'm a big fan of finding a cute card and personalizing it just the way I want it. I search and search for the perfect card. That's where Tiny Prints comes into play! They have the cutest, most adorable things on there. I can't wait to find a card to go with our pictures which I have scheduled already, but that whole picking out outfits to coordinate is a bit on the difficult side. More on that to follow...

Here are a few of my favorite examples of their Christmas Cards


Do you love them too? Here's your chance to win a $50 credit to Tiny Prints! Gotta love that!

Just follow the entry form below...hurry up...Christmas will be here before you know it!

Make sure to check out Tiny Prints Special Offer Page too!


**Note: This is a post sponsored by Tiny Prints. So while I do get a credit to use at tinyprints.com for blogging about their Holiday collection, all of my comments in this post are totally accurate-- I'm a huge Tiny Prints fan whether they sponsor my blog post or not! :)   

Monday, October 15, 2012

Apple Pull Apart Bread

I should really wrap up these apple posts and move on to some pumpkin!

Here is another gooey ooey yummy breakfast treat for fall. I love how easy it is as we all know I'm all for easy. You don't even have to peel the apples in this one!

The recipe comes from the amazing blog Six Sister's Stuff. I'm pretty much in love with them. If I try one of their recipes it's sure to turn out! They even commented on one of my posts one day and I was in heaven since they are like my idols!

Remember that I still have my 2 Year Blog Anniversary Giveaway going on for another day. Go enter before it's to late! I'm giving away a Scentsy warmer and bar. It's simply amazes me how many people have not heard of Scentsy. If you don't have one or don't know what it is please go visit the website. It's simply the most amazing stuff you've ever heard of it. It smells amazing and it's so much safer than burner candles! Plus if you REALLY love it then you can sell it and make some extra cash on the side. Trust me I've bought a lot of extra goodies for myself, like my super duper fancy camera, from selling it!

Next up is another pretty sweet giveaway from Tiny Prints! Stay tuned for that coming in the next few days!

Oh and I've moved into the current century and have Instragram now with my nifty new iPhone! Please find me at julieseatsandtreats. I'm lonely and look like I don't have any friends on there!

Oh and one last thing (I PROMISE!) please leave me comments when you think something looks good, something is fun, you try anything or you just want to say HEY! I LOVE to hear from you all otherwise I feel like I'm blabbing to no one, kind of like when I talk to my hubby! Click the little comment button at the bottom of the post and leave me some lovin'!


Apple Pull Apart Bread

Ingredients
12 frozen dinner rolls, thawed
2 Granny Smith apples, chopped
1/3 c. brown sugar
1/2 c. walnuts, finely chopped
1/2 tsp cinnamon
2 Tbsp butter, melted


1. Preheat oven to 350 degrees. Spray a 9x5 loaf pan with non-stick cooking spray.

2. Mix together the chopped apples, brown sugar, walnuts, and cinnamon until well combined.

3. Using a pair of kitchen scissors, but each roll into thirds. Place 12 small roll pieces on the bottom of the loaf pan. Drizzle a third of the melted butter on top of the roll pieces. Then top with third of apple mixture. Repeat layers two more times, until ingredients are used up.

4. Let rise for about an hour or until rolls have doubled in size. I actually let it raise overnight and it was pouring out over the side. I just stuck a knife into it several times and let the air out and then baked it.

5. Bake for 30-35 minutes, until tops are golden brown and the middle rolls are done.

6. You can drizzle a powdered sugar and milk glaze over the top if you want!

Recipe from: Six Sisters' Stuff


Shared on the following sites - Please give them a visit!

Labels:

Friday, October 12, 2012

Candy Corn M&M Cookies

I've been meaning to make these cookies for over week now and I finally got around to doing it. I had all the ingredients and everything, but life just got in the way.

I made them for my co-worker who informed me the other day that my baking and sharing of treats has been slacking since I had Miss K. I decided it was due time that I shared some treats! We just can't have people making remarks like that can we?

Of course I decided to finally make them possibly on the worst night ever.

It was the night of Miss K's 4 month check up and shots at the doctor. I'm proud to report she is in the 90th percentile for height and weight. Healthy. Robust. Lovable.

Well, mostly lovable. That night went like this -

Get home from the doctor and she's sounds asleep after crying herself to sleep after 4 shots in the the leg. Ouch. It almost did mommy in. It's terrible watching that as any mother can relate. I keep trying to get the hubby to go the doctor appointment and he just won't agree too. Imagine that!

Hurry to make supper. Miss K wakes up. Content laying on floor playing with toys so I get an extra ounce of energy and decide to make cookies. Half way through the cookie making process Miss K starts throwing a fit. Feed Miss K. My supper is done. Inhale supper. Back to making cookies. Miss K is anything but content on that floor. Strap her into her carrying facing out so I can continue to mix the dough up. She's happy. My back hurts. Flip the bowl with the butter into the cookie dough. Luckily it was plastic. Clean up mess. Try laying Miss K back on the floor. She throws a fit. Back into mom's arms she goes. Finally done making cookie dough and start to bake. Forget cookies. Burn cookies. Save a few.

All while the hubby was off sheet rocking at my brother's house. End of story.

I once remember my friend telling me that she tried making cookies while she was home on maternity leave and it took her the majority of the day. I can now relate. Bars. I'm making bars from now on!

Moral of the story? These were dang good cookies, but don't try to do it with a cranky baby that just got shots!

Remember to hurry up and enter the 2 Year Blog Anniversary Giveaway!!!

P.S. I really do love my child to no end don't go getting all judgey on me :)


Candy Corn M&M Cookies
Printer Friendly Recipe

Ingredients
1 1/2 c. flour
1/2 tsp salt
1/2 tsp baking soda
1/8 tsp baking powder
1/2 c. butter, softened
1/2 c. brown sugar
1/4 c. sugar
1 egg
1 tsp vanilla
1 c. white chocolate candy corn M&M's

1. Preheat oven to 375 degrees. Line cookie sheets with parchment paper. Set aside.

2. In a medium bowl, whisk together the flour, salt, baking soda, and baking powder. Set aside.

3. In a large bowl, beat butter, brown sugar and sugar until light and fluffy about 2 minutes. Beat in the egg. Add vanilla and mix. Gradually beat in the flour mixture. Stir in M&M's.

4. Chill dough for 1 hour in refrigerator.

5. Drop dough onto cookie sheets. Bake 10-12 minutes or until slightly golden around the edges. Let cool on pan for 2 minutes and then remove to cooking rack.

Recipe adapted from: Chocolate Moosey


Shared on the following sites - Please give them a visit!

Labels:

Tuesday, October 9, 2012

Apple Struesel Bread

Things that get better with time. Gotta love them don't you?

Take me for example. I'm a firm believer that I'm getting better with time and age. Oh sure when I was graduating high school I thought I had it ALL figured out, like most kids. Yes I say kid because that is exactly what I was. Trying to make all these huge life decisions and thinking that everything was going to work our magically.

You know what? It all did. There's nothing I would change.

Did it work out how I had expected it to at that time? Heck no! Far from it. It worked out even better. I'm blessed and truly happy, but at that point in my life I was dreaming of far different things.

What was my dream? I'll share it with ya! I was going to go to school for a bachelor's degree in Hotel/Restaurant Management, mission accomplished on that one. I have the piece of paper to prove it! Then I was going to go off to some huge city, preferably New York City (of course!), and be a big wig CEO. Along with this dream was a amazing hubby (mission accomplished on this too details to follow), matching BMW's (black preferably), high powered CEO of a major hotel, pencil skirts, suits, etc. Nice Huh?

My reality as it is now - Married to an amazing hubby, one beautiful and precious daughter, living in rural Minnesota (my hometown), driving a truck (Gasp!), working at a telecommunications company as a Service Coordinator, wearing sweats as often as possible (possibly decorated with spit up more often than not) etc. For the record I did live in a city for a few months, I hated it, I did manage a hotel for a few years, I disliked it, but I was good at it and sometimes I miss it.

You know what? I'm happy. I've aged, I've grown, and I've gotten better. I have everything I want, sure I wish for things, but I have what I need. I love living by family (most of the time, love you guys!), knowing the majority of the people I encounter on a daily basis and living in my little community. Things change, people grow and age.

This apple bread is way better the day after you make it! My hubby even commented after he had a piece after it cooled that it was way better. If he notices it must be true!


Apple Struesel Bread
Printer Friendly Recipe

Ingredients
1/2 c. butter, softened
1 c. sugar
2 eggs
1 Tbsp lemon juice
2 tsp vanilla
2 c. apple, peeled and diced
2 c. flour
1 tsp baking soda
1/4 tsp salt

Topping
2 Tbsp brown sugar
2 Tbsp flour
2 Tbsp granulated sugar
1 Tbsp butter
1 tsp cinnamon

1. Beat butter, sugar and eggs until creamy. Beat in lemon juice and vanilla.

2. In a separate bowl mix together flour, baking soda and salt.

3. Gradually stir flour mixture into butter mixture until just moistened. Mix in apples until combined.

4. In small food processor add topping ingredients and pulse until crumbly.

5. Spread half of apple batter into a greased loaf pan. Sprinkle half of struesel topping over batter. Repeat layers for 2nd half of batter and ending with the rest of the topping.

6. Bake at 350 degrees for 60 minutes. Let cool completely before slicing. Remember better with age!

Recipe from:  Semi Homemade Mom


Shared on the following sites - Please give them a visit!

Labels:

Friday, October 5, 2012

Crock Pot Swedish Meatballs

I never knew how hard it was to become a mother. I didn't have the respect I should have gave to all the mom's out there before. I may have shrugged off the "Oh I can't find a babysitter" or "I would rather spend time with my kids" as an excuse before. Now I get it.

Do you ever go to bed and wonder how on earth you are going to climb out of bed and do it all over again? I do. On a regular basis. That's right. You may think that I'm all "put together" and "got it going on", but I'm not.

One mom at daycare was commenting on how Miss K was so adorable (right like you have to tell me!?) and then continued to say of course you would have a content adorable child. Seriously? Did I put some fairy dust on me this morning and trick you all into thinking I'm completely organized and wonder woman?

I'm not. I hate to break it to you. I dare you to look at my house on any random night. It's scary. Wait Halloween is coming. I'm just going with the flow. Not sure what my excuse will be after Halloween!


I'm going through that right now. Most days life is grand and I get through the days, but I also have "episodes" where I wonder how on earth I'm going to keep this up. Something has got to give. But then it gets better and everything comes together. For about a month, then falls apart.

Yup that's right every month. I'm now coming to the conclusion it's directly correlated with PMS. UGH. Seriously.

So I'm almost done with this months episode. My hubby is going to jump for joy when this week is over. I sometimes am amazed he still loves me.

It doesn't help Miss K has been cranky with a touch of a cold. See my child is not perfectly content Ms. Daycare Mommy!

My question is how do you balance everything with kids?

I'll help you with the supper part! This is perfect for all you hard working, crazy busy moms out there. The crock pot is a magical tool. I LOVE coming home to find the majority of my supper done and I don't have to think about making something. Just throw this in and you'll be greeted by the aroma of supper being done when you walk in your front door!


Crock Pot Swedish Meatballs
Printer Friendly Recipe

Ingredients
2 1/2 lbs frozen meatballs
1 can cream of mushroom soup
1 golden mushroom soup
1 can beef broth
1 envelope brown gravy mix
1/2 c. water

1. Mix everything except meatballs together. Pour into crock pot. Add meatballs

2. Cook on low for 6 hours.


Shared on the following sites - Please give them a visit!
Our Delightful Home

Labels:

Monday, October 1, 2012

Cake Batter Puppy Chow

*WARNING*

This treat is HIGHLY addictive ~ Do not blame me for your pants not fitting tomorrow morning, but you will enjoy yourself while you eat it! 

Oh and those "skinny" jeans you want to get into...this will not help your cause at all. Like those "pre-pregnancy" pants that I still can't get into. Don't get me wrong I can squeeze into most of them but a few of them still just. won't. button. Ugh. Back to the gym I go so I can eat more of this amazing treat and still be able to fit into my pants! 

If you have a spare 10 minutes please whip up a batch of this. Your kids will love you. Your hubby will love you. Your friends will love you. 

Your pants will not. I repeat. Your pants will not love you. 

But don't worry. I'll still love you!


Cake Batter Puppy Chow

Ingredients
5 c. Chex cereal
10 oz (5 squares) vanilla flavored almond bark, or white chocolate chips
1 1/2 c. Funfetti cake mix
1/2 c. powdered sugar

1. Melt Almond Bark according to package directions. 

2. Pour cereal into a large bowl and drizzle Almond Bark over the cereal. Mix gently with a large spoon. 

3. Dump the cake mix and powdered sugar in the bowl and mix gently until cereal is evenly coated. 

*You could also mix ingredients in a large paper bag if you don't have a big enough bowl. Then just shake the items!

Recipe From: Six Sisters' Stuff

Shared on the following sites - Please give them a visit! 

Labels: