Friday, December 30, 2011

New Year's Eve Recipe Round-Up

Wow...can you believe that another whole year has flew past us? I know, I know I think I say this every year and I keep waiting for time to slow down, but it just doesn't happen does it?

Looking back over the year I have been blessed in so many ways including all of you! Thank you so much for reading my blog, leaving me comments and following me through this journey. I love to hear from you so never be shy in leaving me comments!

I thought it would be fun to do a quick little recipe round up if you are still looking for something to celebrate bringing in the New Year!


Thursday, December 29, 2011

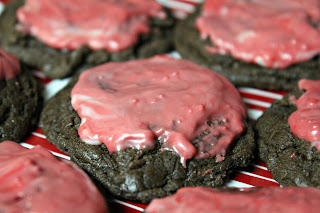
Andes Mint Cookies

Oh my goodness these cookies are amazing! I know I should have made them a bit earlier and you could have made them with plenty of time for Christmas but I failed and just tried the recipe.

To redeem myself I could claim I'm just a bit early for Valentine's Day since these would be super cute V-Day, so if you want to be really ahead of the game go snap up those Red Andes Mints that will be on the after Christmas sale. See I was really just looking out and saving you a buck!

I think I went crazy for a moment and volunteered to bring treats on Sunday after church. Therefore I needed a bunch of treat recipes that I could make quickly! I love that this recipe starts with a box mix and then you just plop the mint on top of the cookie, let it sit a few minutes and spread. They look all fancy and it's so simple. Plus they literally melt in your mouth.


Andes Mint Cookies
Printer Friendly Recipe

Ingredients
1 Devil's Food Cake Mix
1/2 c. oil
2 eggs
1 package Andes Mints

1. Mix cake, oil and eggs together. Drop by spoonfuls onto a cookie sheet. Bake at 350 degrees for 9 minutes.

2. Take out of oven and place a mint on top of each cookie. Let it melt for about 5 minutes. Spread mint like frosting with a back of a spoon.

Adapted from: Six Sisters' Stuff

Shared on the following sites - Please give them a visit!

Labels:

Wednesday, December 28, 2011

Snack Mix

I have all these wonderful posts for you after my baking and snack frenzy I went on for the holidays and my camera cord is no were to be found. Seriously. It's such a horrible thing. I went and ordered a new one because I don't know where it is. Hopefully it gets here soon so I can continue my posting.

I remember having it a week ago and I think it will turn up so I just keep waiting, and looking, and waiting. I have this thing called "Baby Brain". I never believe all my friends that claimed this existed. Whenever they talked about being pregnant and forgetful I just thought to myself, "Oh sure it's just an excuse so you can blame it on something."

WELL was I wrong! My hubby asked if I'd found it...I informed him no. He told me to look next to the buttons and my bonus check from work, as I have lost those too.

Bet my mind is right next too them!

Ok enough about me and my forgetfulness. This recipe is wonderful. I always make it around Christmas time, but it would be great for a snack anytime. The recipe was handed down to me but my Grandma and Great Aunt Eunice. Now even my sister-in-law recognizes this snack mix for a holiday treat. When it graced my mom's table she was saying "Ohhh that yummy snack mix!".

Plus it simple. I mean it uses a grocery bag to mix it in so there's hardly any clean up involved. I'm telling you my Grandma was a genius to snap this one up!


Snack Mix

Ingredients
1/2 c. butter
1/4 c. white syrup
1 c. brown sugar
1/2 tsp salt

1/2 tsp baking soda
1 tsp vanilla

3 c. Crispix
3 c. Golden Grahams
3 c. Capt Crunch
3 c. Pretzel Sticks
3 c. Peanuts

2 c. M&M's
2 c. Raisins

1. Combine butter, white syrup, brown sugar and salt in 2 qt bowl. Microwave 2 min, stir and microwave another 2 minutes.

2. Add baking soda and vanilla, mix well. Pour over cereal mix in a large paper grocery bag.

3. Roll top down and microwave 1 1/2 min. Shake. Microwave another minute.

4. Add M&M's and raisins. Shake again. Spread on wax paper to cool.

5. Spread on wax paper to cool. Store in an airtight container.


Shared on the following sites - Please give them a visit!


Labels:

Tuesday, December 20, 2011

Chex Party Mix Exchange Giveway!

I have a giveaway for you and it includes free snacks! It's called the Chex Party Mix-Change. I unfortunately didn't have time to have people over with the holidays. But it would be an awesome idea for a blustery winter day in January when everyone has cabin fever and we know that happens! You can win a package to host your own Chex Party Mix-Change by following the rules to enter the giveaway at the end of the post!

I am a chex mix lover and my mom always makes it around Christmas. When I was contact by My Blog Spark to host a giveaway and make a couple different Chex Mixes I knew this was right up my ally.

I always had thought the true way to make Chex Mix was in the oven and it seemed like it was time consuming so I hardly ever did this. When the recipes arrived with my kit there was a 15 minute microwave Chex Mix. I knew I had to try this. It was wonderful. It didn't have my mom's love in it, so it didn't taste quite as good but it was close!

I also made Chex PB & Chocolate Blast. This didn't turn out quite as well. It could very well be handicap that caused this. I couldn't get my peanut butter or white chocolate chips to melt in the microwave. They just turned into a big lump. I switched to chocolate and white almond bark so it was peanut butter anymore, but this worked much better.

Original Chex Mix Recipe

Ingredients
3cups Corn Chex® cereal
3cups Rice Chex® cereal
3cups Wheat Chex® cereal
1cup mixed nuts
1cup bite-size pretzels
1cup garlic-flavor bite-size bagel chips or regular-size bagel chips, broken into 1-inch pieces
6tablespoons butter or margarine
2tablespoons Worcestershire sauce
1 1/2teaspoons seasoned salt
3/4teaspoon garlic powder
1/2teaspoon onion powder


Preparation Directions

1. In large microwavable bowl, mix cereals, nuts, pretzels and bagel chips; set aside. In small microwavable bowl, microwave butter uncovered on High about 40 seconds or until melted. Stir in seasonings. Pour over cereal mixture; stir until evenly coated.

2. Microwave uncovered on High 5 to 6 minutes, thoroughly stirring every 2 minutes. Spread on paper towels to cool. Store in airtight container.

The lucky recipients of these treats were my coworkers in those cute little red containers!

If you win your gift pack will include the following:


  • 2 boxes of Chex cereal to create Chex Party Mix recipes
  • 5 featured Chex Party Mix recipes
  • 10 takeout containers so your guests can take their Chex Party Mix to-go
  • $20 gift card to purchase recipe ingredients and decorating supplies 


  • “Disclosure: The Chex Party Mix-Change product, information, and giveaway have been provided by Chex through MyBlogSpark.”

    You can enter the giveaway by doing any of the following or ALL! Make sure to leave your email address so I can contact you if you are the winner!

    1. Leave a comment telling me what your favorite Chex Mix recipe is.

    2. Follow Julie's Eats & Treats on Facebook and leave me a comment saying you do.

    3. Follow Julie's Eats & Treats on Twitter and leave me a comment saying you do.

    4. Share my giveaway on Facebook and let me know you did this. The easiest way is visiting my Facebook page and just sharing the giveaway post!

    The giveaway is open until Christmas Eve, December 24th at midnight. Good Luck!!

    Saturday, December 17, 2011

    Cheeseburger Soup

    I love soup on cold blustery days. It warms the soul from the inside out. Not that we've had to many of those cold blustery days yet this winter!

    The snow is scarce if there is any at all in Minnesota. I love the fact that we've had so many gorgeous days this late into the year, but I often wonder if we'll have winter until July? I sure hope not. I told hubby that we might have to battle a snowstorm to deliver this baby in the end of May if we get payback for this weather. Let's all cross our fingers that does not happen!

    This soup is easy and hearty. The hubby gave it two thumbs up and I'll agree with him on that one!


    Cheeseburger Soup
    Printer Friendly Recipe

    Ingredients
    1 lb ground beef
    3/4 c. chopped onion
    1/4 c. shredded carrots
    1/2 tsp dried basil
    1/2 tsp dried parsley flakes
    4 Tbsp butter, divided
    2 cans chicken broth
    4 c. diced peeled potatoes
    1/4 c. all-purpose flour
    2 c. (8 ounces) Velveeta cheese
    1 1/2 c. milk
    1/4 tsp pepper
    1/2 tsp salt
    1/4 c. sour cream

    1. In a large pan brown the beef; drain and set aside. In the same pan, saute the onion, carrots, basil and parsley in 1 tbsp butter until vegetables are tender. Add the broth, potatoes and beef. Bring to a boil. Reduce heat; cover and simmer for 10-12 minutes or until potatoes are tender.

    2. Meanwhile, in a small skillet, melt remaining butter. Add flour; cook and stir 3-5 minutes or until bubbly. Add to soup; bring to a boil. Cook and stir for 2 minutes. Reduce heat to low. Stir in cheese, milk, salt and pepper; cook and stir until cheese melts. Remove from the heat; blend in sour cream.

    Adapted from: Taste of Home

    Labels:

    Tuesday, December 13, 2011

    Make Ahead Mashed Potatoes

    Can you believe it? I've officially posted three times this week once again. I bet you thought I wasn't capable of it!

    This is a staple for our holiday get togethers and I recommend it becomes yours too. The fact that you can make it ahead and then just stick it in the oven that day is a wonderful benefit. I mean honestly as much as we like to have it together sometimes the day of the holiday gets a bit hectic!

    This recipe is another "mom" original so I'm once again saying you can't go wrong!

    If you are looking for something for that holiday get together this is it!


    Make Ahead Mashed Potatoes
    Printer Friendly Recipe

    Ingredients
    5 bls potatoes (13 medium)
    4 oz cream cheese
    1 c. sour cream
    2 tsp onion salt
    1 tsp salt (if desired)
    1/4 tsp pepper
    2 Tbsp butter

    1. Cook potatoes and drain off water. Add ingredients and beat till fluffy. Add milk if needed.

    2. Cover and refrigerate ~ Use within two weeks.

    3. Bake in 9x13 pan at 350 degrees for 30-45 minutes.

    Labels:

    Oreo Truffles

    So I'm a little behind most of you it seems. I have never made Oreo Truffles. This popular treat has eluded me all these years so this year I decided to change this.

    Let's say that my little brother was sure happy that I changed this because he couldn't keep his fingers out of these treats! In fact I made a treat plate for him, my brother-in-law (who happens to be little bro's best friend aka BFF) and little bro STOLE his Oreo Truffles off his plate. The little snitch!

    I'm not going to lie. When others are stealing treats from each other because they like them so much, well it makes me happy. It equals a success in my mind!

    These little babies are quick and easy to make so don't be like me and run away when you think about making them for years!


    Oreo Truffles
    Printer Friendly Recipe

    Ingredients
    1 package cream cheese, softened
    1 package Oreos, crushed
    1 package almond bark

    1. Mix cream cheese and Oreos together. Make into small balls and place on a cookie sheet. Freeze for about 10 minutes.

    2. Melt the almond bark (I used white, but you can use chocolate!) in a double boiler. If you don't have a double boiler just use the microwave. I find it easier in the double boiler because the almond bark doesn't get hard as fast.

    3. Take the truffles out of the freezer and dip in the almond bark. Use forks to remove from the almond bark. Place on wax paper. Sprinkle crushed Oreos over truffles if desired.

    Labels:

    Sunday, December 11, 2011

    Snowman Cookies

    I love Christmas treats. I love making them, I love eating them and I love sharing them. They are just fun all around! I spied these cuties on Pinterest. If you haven't explored the wonderful world of Pinterest you are missing out and you NEED to go there now.

    These are so adorable and so easy. I was intimidated by the looks of them and thought the would be a little bit time consuming but they really weren't at all. Totally worth the time because they are so cute!

    I had a little help from my niece Hallie on these and it's a fun activity for kids. She was in charge of the M&M decorating. I love sharing these memories with her. She did look at me half way through our Christmas treat day and inform me, "You know Julie you will have a little munchkin running around next year. How will we do this?" We decided we'd make Daddy take care of the munchkin and still have girls day!


    Snowman Cookies
    Printer Friendly Recipe

    Ingredients
    1 package Nutter Butter Cookies
    1 package White Almond Bark
    M&M's
    Orange Tic Tacs
    Black Decorator Icing

    1. Melt almond bark in double boiler. If you don't have a double boiler you can microwave it. I find that melting it in the double boiler always me more time to dip before it hardens again.

    2. Dip Nutter Butter Cookies in the almond bark and lay on wax paper. Dip all the cookies. Then put the M&M's on the cookies with the "M" face down. Put one tic tac on the cookie for the nose.

    3. Squirt the black decorator icing into a small ziplock and cut a tiny hole in the corner. Place the eyes and mouth on the cookie.

    Recipe from: My Pretty Purse


    Shared on the following sites - Please give them a visit!

    Labels: